Holiday Traditions Around the World & Guided Drawing!
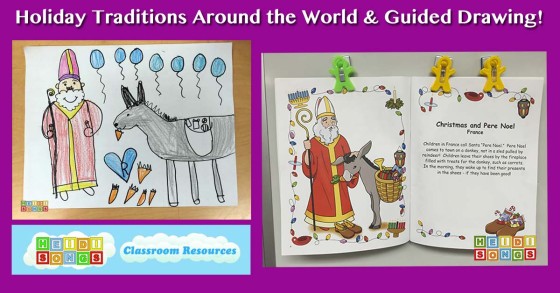
Here is a fun and FREE guided drawing lesson that you can do along with your Holiday Traditions Around the World unit! We learned how to draw France's version of Santa, known as "Pere Noel," and the donkey that he rides on when he brings his gifts! I did this with my first and second graders this week, and I'm so pleased with the results! I hope you get a chance to make use of it and enjoy it, too!
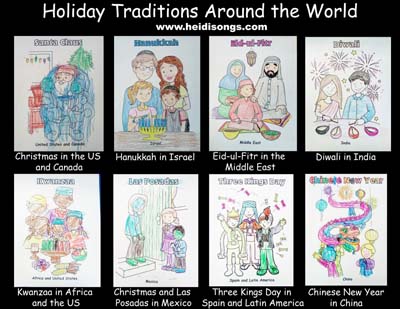
To begin, I got out my trusty Holiday Traditions Around the World book and flipped to the page on France. We discussed how this tradition is different and how it is the same as ours here in the United States. We also discussed how it is different from or similar to some of the other countries' traditions we have learned about so far.
This book can be purchased in print or as a download. Above are the student coloring pages.
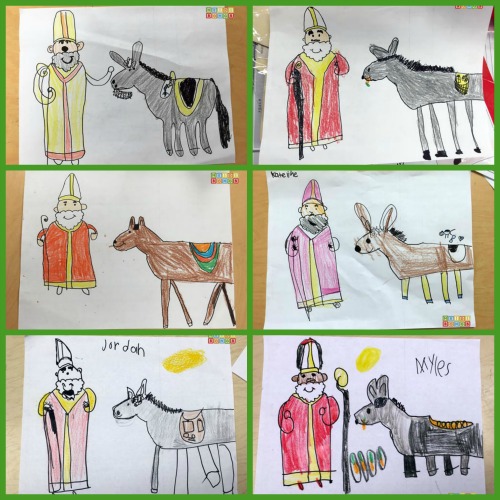
After we finished with this part of the lesson, we were ready for the guided drawing portion. In case you are not familiar with the story, in France, Santa is known as Pere Noel (AKA "Father Christmas.") Instead of coming to town in a sleigh drawn by flying reindeer, he comes in riding a donkey! Children leave treats for the donkey in their shoes, such as carrots! In return, Pere Noel leaves presents in their shoes!
Now you may be wondering why should anyone bother with guided drawing. What purpose does it serve? Well, besides being a wonderful, NO PREP art project, it is a GREAT way to practice these skills: - following directions - shape formation - direction and positional vocabulary - fine motor skills - visual perception skills - self-regulation skills (they must wait, be patient, and sit quietly, and not "draw ahead" of the teacher.) - perseverance through difficult tasks
Oh, and did I mention that this is a NO PREP art project? LOL!
I have been doing guided drawing with my class since the beginning of the year. I have always done it when I taught Kindergarten, and now I still am enjoying it with my first and second graders just as much! If you read my posts in the past, you may remember that most of my students started the year with barely any experience with guided drawing. In fact, their "No David" drawings at the beginning of the year looked almost identical to my former Kindergarten students' drawings, and I was pretty shocked.
Well, BOY, have things changed. Just LOOK at these drawings!
One thing I learned about my current class is that they REALLY need a point of reference to begin with when we start our drawings. It seems to make all the difference! They need to have the first circle or square lightly drawn onto the paper in the correct size and location before we begin. They have a really tough time figuring out how large or small an object should be, or where it should go. Because the biggest issue with guided drawing is that if you start off by making that first shape the wrong size, you often just can't continue.
For example, if the first shape to make is the head, and the child makes the head too small, then there will be no room for the eyes, nose, or mouth. If the child makes the head too low on the paper, then there will be no room for the rest of the body. And if he makes it in the center of the paper after I told them to put it on the side, then there will be no room for the second object on the other side of the paper.
That sort of problem is terribly frustrating for my students this year, so I decided to go ahead and give them the starting points pre-traced on to the paper for our Holidays Around the World Guided Drawing project. So I penciled in the beard and the part of the head that goes below the hat. Then I started the shoulders but stopped there. I knew that the donkey would be a totally different issue, so I drew the shape of the head, leaving a space for the ears and a line where the neck would start going down. Then xeroxed one copy for each child, plus a copy for myself.
When I do guided drawing, I always try to draw in front of the children using a paper of the very same size as theirs, because I think it helps them keep the perception and size straight. And then in addition to that, I also enlarge some of the smaller parts on my whiteboard, as you can see in the photo. I have also, at times, used my document camera. But I prefer to draw "live and in person" right in front of them rather than off to the side by my doc cam. That way, I can really see what they are doing and can better explain the parts that they are not getting.
Anyway, long story short- the lesson went great, and the kids were super pleased with their drawings! You can see for yourself how pretty they are! Both the first and second graders were so happy!
P.S. Don't forget all our videos are available to STREAM onUScreen, FREE for the first 30 days! It's an awesome way to bring some EASY, active learning to your students during this time, and they can always cancel right before they are ever charged, like on day 29! Check out the info page on our website for more info!
---------------------------------- Follow me! Did you enjoy this post? Do me a favor and share it with your friends! And follow this blog by signing up for my email updates here, and follow me on TPT! I'm also on Pinterest, Facebook, Twitter, Instagram, and YouTube, too! Don't forget to sign up for our email newsletter for special deals and promo codes that you won't find out about anywhere else.