


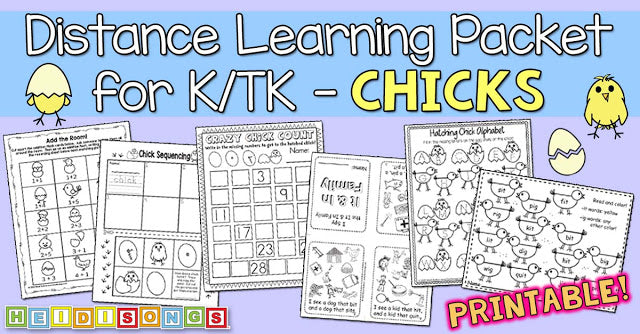


Have you seen these neat little alphabet gems like the ones in the picture above? These adorable alphabet gems are so easy to make and can be used for a variety of activities! With so many alphabet and spelling activities, it is great to have tools like these to for word building activities, practicing ABC order, and matching beginning sounds of pictured words to letters, and many other skills!
I made these Alphabet Gems using fairly standard crafting materials, some of which came from the good old dollar store!

It is important that your gems have one flat side, this is where your sticker will go. Any old alphabet stickers will work for this project, as long as they are smaller than the area of your gem surface. I chose stickers that were circular in shape, and that were glittery, so that the Alphabet “gems” would really live up to their name!
I did use a special kind of glue to be sure those stickers were nice and stuck! It is called the “Amazing E6000 Glue” and I bought it from Michaels for just under $6.00.

It really is amazing how sticky this glue is! That being said, be careful when using it. Have a damp paper towel nearby to keep your fingers from sticking to everything else and set this glue on a paper plate or hefty piece of paper to keep it from ruining any furniture. It also has a pretty strong odor so DEFINITELY keep this away from children. While this glue is specifically made for glassy materials, I have also seen this type of project done with Modge Podge so that might be an option for you as well. I haven’t tried it myself though so I couldn’t say which product works better.
To start this project, take a VERY small dab of glue and apply it to the flat side of the gem. You need very little glue for each gem so less is more here! Be sure to spread the glue around a bit so it is just a thin layer, as you will be able to clearly see larger globs of glue through the top of your gem if you are not careful.
Next, carefully place the sticker, letter side down, onto the flat side of the gem and place it upside down to dry. Repeat until all letters are complete. It doesn’t take too long for the glue to dry, maybe 30 minutes at most.

When I finished we decided that we didn’t like that the bottoms of each gem were now sticky, so we went back over to the bottom side of each gem and placed an identical sticker down so that each gem was double-sided. This helped with stickiness but also made these gems self-checking!
These Alphabet Gems can be used for a variety of alphabet and spelling activities.


They are great for sight word practice, or even just letter recognition! I think that they are extremely appealing! I had them laid out for display at the last two conferences I presented at in North Carolina and in TX, and the teachers kept stopping, staring, and asking me to explain how I made them.  So even though the glare from the photos makes it hard to picture- trust me- you’ll LOVE these things!
Don’t forget to check out our Alphabet songs to help kids learn the letters and sounds, and much more on our website, HeidiSongs.com!
—————————————————————————
If you enjoyed this blog post, please consider signing up for our email updates! You can also follow this blog on Bloglovin’, and keep in touch with me on Pinterest, Facebook, Twitter, Google+ and YouTube, too! Don’t forget to sign up for our email newsletter (on the left sidebar) for special deals and promo codes that you won’t find out about anywhere else.


