


Have you ever wanted to hatch chicks in your classroom, but didn’t really know how to get started or what to do? In this post, I’m going to tell you how I have hatched chicks successfully each year in my classroom for the last fifteen years or more! It’s tons of fun, and the children just LOVE it! And once you have the equipment, you can do it every single year! Oh, BOY!

I really lucked out because as a beginning kindergarten teacher, my teammates had already invested in some incubators. I do not know how they got them- if they wrote a grant for them, or if the school paid for them. But they had four incubators so that there would be one for each Kindergarten classroom. They asked me if I wanted to hatch chicks, and I happily agreed! Then I was trained on how to do it and given the eggs. Once I learned how, I helped the new teachers learn at my previous school. And that is exactly what I did for the first grade teachers at my school this year! I was able to borrow the incubators from my previous school, since they decided not to hatch chicks there this year.
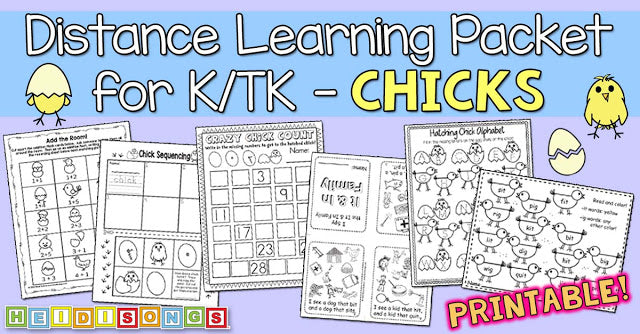
There are MANY instructional activities that can be done along with hatching chicks! As kids can learn about the life cycle, they can write about it of course. They can sequence the life cycle and put the pictures in order. They write a “how to” paragraph on how to hatch a chick, and etc., etc., etc.! Your imagination is the limit!

Disclaimer: I am NOT AN EXPERT in hatching chicks! I’m just a teacher that has done this with reasonable success for many years. If you are an expert and find an error in my instructions, please let me know and I will fix it. Note: a simple internet search can provide reliable, scientific information on care and incubation of eggs. Here is one such site that seems reliable.
What Do You Need?
To get started, you’ll need the following supplies:
1. An incubator, preferably one with a fan and an automatic egg turner. This is the kind I use. But I have heard great things about this kind here.

*2018 Update- This is the new incubator I bought. Egg Incubator, HBlife 9-12 Digital Fully Automatic Incubator for Chicken Eggs, Poultry Hatcher for Chickens Ducks Goose Birds

I highly recommend watching the YouTube movie they link to on how to set it up and be sure to cross check the temperature against another thermometer and adjust (calibrate) the digital temperature given so that it matches your thermometer. It’s easy with the help of their video, and so far, it’s working great! The incubator was $75.99 on Amazon Prime.
2. A box of some type to put the chicks in when they hatch. It can be a cardboard box, or a plastic tub, or even a terrarium.

3. Chick starter mash to feed your babies! Pick your favorite from this Amazon search. I buy mine at a local grain and feed store.
4. A chick feeder and waterer.
5. A brooder lamp to keep your chicks warm. There are better, professional ones than the one I have in the picture below, but frankly, I’ve never had any trouble with using just a plain old desk lamp!

6. Some bedding material for the bottom of their box. I have always used hay, but I have been told recently that this is too slippery for chicks. Here is something I will probably purchase on Amazon to replace it! At the present time, I have alfalfa down on top of newspaper as bedding for my chicks at the moment, since that was recommended by the grain and feed store. Also, I would have had to buy a giant bale of hay, so I accepted his advice on the alfalfa! They seem to be just fine.

7. A combination thermometer and hygrometer for the incubator. Just in case you didn’t know, a hygrometer measures the humidity in the incubator, which is very important for hatching!
8. Fertilized chicken eggs! It’s always best if you can find them locally so that you do not have to have them shipped. Otherwise, you can search online. I get mine from a local lady that keeps chickens and a few roosters. I found her by putting a notice on Facebook and a friend knew of her! She connected us, and the rest is history. If I let her know in advance when I will need them, she turns her roosters loose with the chickens for a few days! LOL! Another Facebook friend said that she picked her fertilized eggs up right from the refrigerated section from Trader Joe’s!!!! I never would have guessed that!
9. Optional: An egg candler is a nice thing to have! You can take it into a dark room, such a bathroom with the lights off. You shine the light behind the egg and take a look at it. You should be able to see whether or not it is developing! That way, you can throw out the duds after seven days, or start over, etc.
Tips for Successful Hatching
1. Set up the incubator about a week in advance to get the temperature regulated and steady well BEFORE you expect to start those eggs! This is extremely important if you have an older incubator like I do. The knobs can be very sensitive, especially if you do not have a digital one. The temperature needs to remain stable at about 98-102 degrees fahrenheit before you put those eggs in. The humidity needs to be at about 50%. If the temperature isn’t stable and holding at around 100, you could kill your chicks right off the bat.

2. Make sure that the egg turner is in place and temp is holding steady BEFORE you start the eggs. Again, this is very important if you use the cheaper model incubator like I have! Maybe you don’t have to worry if you have a nicer model! But if you forget, don’t try to add the egg turner on the same day as you begin incubation. If it’s hard to install, you’ll lose all of that warm, moist air as you install it. As a result, your chicks might die in the few days it takes to restabilize the temperature. We think this is what may have happened to one of our teammates this year. Remember, the eggs need to be kept at 100 degrees at all times, (or as close as you can get it to that!) During my last round of hatching chicks, I couldn’t get the temperature to stabilize at 100, but it settled in at 101-102 degrees, so I gave up and let them go at that temp. I had five hatch out of ten- but it’s probably time to get a new incubator!
3. Try to stabilize the temperature in the same spot that you are going to actually incubate them, because if you move them from one spot or outlet to another, you could wind up with a different temperature in the new spot. (That’s the problem when a difference of even one degree up or down actually matters!) And then you’ll have to start over!

4. If the temperature is a bit high, your eggs will probably hatch a bit earlier, like maybe 1-2 days. If it is low, they will probably hatch a bit later, perhaps averaging 1-2 days. But I have even had an egg hatch FOUR or FIVE DAYS LATE! This year, they hatched a day and a half early, probably because the temperature was holding at about 101 – 102 degrees most of the time.

5. Plan on 21 days ahead for your chicks to hatch! If you start them on a Wednesday, they’ll probably hatch on a Wednesday. This year, I started them on a Tuesday afternoon, and they started hatching on a Monday morning. I was glad we didn’t miss it!

6. If your incubator has knobs that could possibly be turned easily by a child, find a way to cover them up or make it so that they cannot reach them or turn them. An incubator with knobs can look like a busy box or a fun little toy to a child, and a curious little one may decide to reach out and turn one. I would also bet that teachers with digital incubators may have had issues with kids pressing buttons that they should not press! This can change the temperature on your incubator and either cook or freeze your babies! Some of our incubators have this issue, and so we cover the knobs with a dixie cup and tape them firmly down to help the kids resist temptation.

7. The eggs should be placed big end up, (pointy end down) in the egg turner. If you cannot see a difference, you can candle them and look for an air bubble. The air bubble should be at the top.

8. About 6-7 days before they hatch, raise the humidity level in the incubator to about 60%. They need the air to be very moist to help them get out of their eggs!

9. About 3-4 days before you expect them to hatch, remove the egg turner. The chicks will have a hard time hatching if they are in the turners!

10. Try not to let a lot of warm, wet air out of that incubator if you reach in to pull out a chick! Each time you release that air, it seems to make it a little harder on the remaining chicks to hatch out of their eggs. One of my teammates this year let her newly hatched chicks remain undisturbed in the incubator for a good twelve hours before disturbing them- and she had eight out of nine chicks hatch!!!!

11. After hatching, chicks should be alright if left in the incubator even for up to 24 hours! The gooey stuff remaining in the egg shell is their food during that time. Wait until they are dry, warm, and fluffed out a little before removing. I read somewhere that it is better to leave chicks in the incubator than to disturb the air temperature by opening it to remove them. In my experience- at least with my cheap, old, incubator, anyway- every time you open it once hatching has begun, you make it less likely that his brother will hatch! So just keep that in mind as you open and close the incubator.


12. Watch any other chicks that have previously hatched to be sure they don’t pick on the other new ones when you move them to the brooding box. There is a definite pecking order amongst chickens!
Here’s a little video one of my teammates posted on YouTube of her chick hatching!! It’s kind of neat how it looks like the other chick seems to be helping his brother out!
Classroom Management of the Chicks after Hatching
You can expect the children to be extremely curious and incredibly excited when the chicks finally hatch! It may be a hard day as far as management is concerned, but it will be worth it! Here is how I try to keep control of a situation that can easily get out of control!
– Avoid situations in which children will all try to crowd around the incubator to see the chicks all at once. I put a document camera over the incubator window and projected what was happening, and that helped a lot. However, the doc cam that I have this year didn’t work as well as my last one, and the picture was very dark. Next time, I will check that and ask for help in ADVANCE- because it was VERY frustrating for the children that couldn’t see!
– Have the children make a line to take a look through the incubator windows, and then count to ten while the kids take a look two by two. Then send them back to the end of the line to look again, or send them back to their seats. Be very firm with children that do not listen to your instructions, and you’ll have a better day.
– I let the children touch the chicks with one finger the day AFTER they hatch, but not at all on the day they hatch. I think that they are too fragile.
– Two days after they hatch, I am comfortable with letting the kids hold a chick briefly while I take their picture with it. Then they put it back.
– Three days or more after they hatch, I am comfortable with having a volunteer supervise the children as they handle the chicks as part of our small group rotation. The kids sit on the carpet in a circle with their spread legs out, making a sort of small fence for the chicks to wander about in. Then my helper will show them how to hold the chicks, pet them, and play with them a little bit. That way, each child can have a good long time with them. I do this as often as possible to give the children as many experiences and as much time with the chicks as possible.
– Years ago, one of my teacher friends let parents and kids handle the chicks all that they wanted at our Open House (the night when parents visit to see school projects.) The next morning, both of her chicks were dead, and she was devastated! They were just handled too much. So be careful!
I usually keep our chicks for about two and a half weeks, and then after that they are too big to keep. The longest I have kept them is for three weeks. I always try to time the hatching just right so that they will be about a week or two old right when we have our big Open House, when families come to visit. The children are so excited to show their parents the chicks that I always get a GREAT turnout! It’s not hard to do, you just have to count backwards 21 days, and add an extra week to stabilize the temperature in the incubator.
Before we finished up, I wanted to share something COOL! Our Musical Math Vol 2 DVD received an AWARD!!!! 

It won an Academics’ Choice Award! Check out some of the review highlights:
“Many math skills were introduced, including concepts and vocabulary that I haven’t seen introduced through other CD’s or DVD’s that are common core specific. There are a wide variety of math concepts covered and introduced on the video.”
“The animation + real person caught and held the attention of the kids. The songs were catchy enough, that even my older kids stopped to watch. My preschooler quickly started singing along by the 2nd time watching. I think the DVD would work great to introduce or reinforce a specific concept, or simply to let 1st grade, kindergarten or preschool age children watch several times without additional teaching.”
“The songs were engaging and age appropriate. They didn’t annoy my older kids like some preschool/early elementary videos do. The kids enjoyed seeing real people as well as the animation. Most concepts were presented clearly.”
As you can see, we are VERY honored and excited about this award and feedback! Which leads me to tell you some MORE exciting news! – Our Musical Math Volume 1 DVD has been RE-DONE to match the new animated style of Musical Math Vol 2 and our other newer DVDs. It’s the same great songs with new animation with our dancers! Check out this preview below!!!
Keep a look out for this new DVD! We should be getting it in next week!!
– Heidi
———————————-
Follow me! Did you enjoy this post? Do me a favor and share it with your friends! And follow this blog by signing up email updates, or follow on Bloglovin’, or follow me on TPT! I’m also on Pinterest, Facebook, Twitter, Instagram, Google+ and YouTube, too! Don’t forget to sign up for our email newsletter (on the left sidebar) for special deals and promo codes that you won’t find out about anywhere else.


